Monday, July 26, 2010

Beautiful Dreamer

She makes me breathless with her beauty, her soft, sweet perfection.


I don't want her to grow up out of this precious baby stage. But perversely, I am so excited about the possibilities of our future together- Mother and Daughter. playmates. friends. supporting. laughing. sharing. talking. helping each other. crying. hugging. and kissing. She already brings me to tears just with the very joy of having her here. She is real! Not just a hope, a dream, some far off idea. She is here! Thank you God. Such gratitude overwhelms me daily!


Saturday, July 24, 2010

Paper Flower Tutorial using vintage sewing patterns (part 2)

In this tutorial I am going to show you how to make these pretty tissue paper flowers out of vintage sewing patterns.  (Your patterns don't have to be vintage, but that is what I had on hand when I made these! Plus they are quite cheap, it seems the uglier that the vintage patterns are,  the cheaper they are, which is just perfect if you are going to repurpose them into something else instead of using them to sew your hubby a brand new leisure suit with bell bottoms!)

 These flowers are super easy to make and there are several tutorials out there already... I think I might have first learned how to make these about 3 or 4 years ago from Martha Stewart or somewhere... But just in case you haven't seen a how-to before here is my version of it!

All you'll need for these flowers is the following:

  • Scissors

  • Tissue paper (mine is a vintage pattern!)

  • Florist wire

  • Buttons (Vintage shell and mother of pearl ones are what I used!)

  • Glue

  • pliers
 First you'll need to cut 4 layers of paper about 4 inches (10 cm) wide by about 8 inches (20 cm) long like this:
 

Stack the sheets of tissue paper and then starting on one of the short ends begin making small accordion pleats (each of my pleats is about as wide as my finger, doesn't have to be exact just make them about the same) like this:


Once you have the whole stack of paper pleated then cut a length of wire and fold over the middle of the pleated paper and twist it up firmly to hold the paper like this: (by the way that is what I use the pliers for, to grasp the wire and twist it firmly around the folded paper)


This picture actually shows 2 steps... after the wire is twisted around the middle of your paper, you can take the scissors and make the ends of your paper into petal shapes. Sometimes I make them rounded and sometimes I make them pointy and triangular. Both end up pretty!

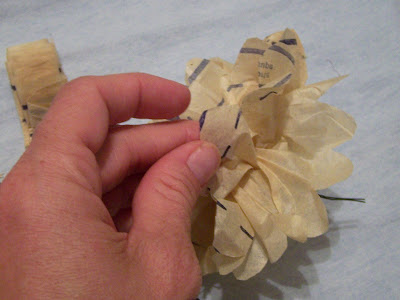
Next you need to begin separating the layers of tissue paper. Unfold one end of your flower and begin to carefully separate the layers of petals. Be careful this paper tears easily! (guess how I know that?!) After you finish with one side turn it around and do the other side the same way!


OK for this next step I don't have a picture. Sorry I thought I took a couple so I could choose from the best one and there weren't any there of this step when I downloaded them... hmm. Now your flower should look very fluffy like a paper pompom. You can leave it just like that or you can take it one step further and find the center of the flower where the wire is wrapped around it. Place your thumb there on the top of the wire, and find the very bottom where the wire pokes out of the base of the flower. Carefully smoosh those two sides together (Isn't smoosh a fun word?!) The center of your flower should flatten out quite a bit and you will probably need to re-tighten the wire stem, by twisting it some more. Once the center has been flattened some you can add a button like I did on this flower:

The button is a shank button that I just glued on using bead and jewelry glue, but any strong clear drying glue should work fine.
Here are some pictures of other flowers I've made using the same technique. The last picture shows one with pointy petals instead of round cut petals.

Friday, July 23, 2010

Paper Flower Tutorial using Vintage Sewing Patterns part 1

Yesterday was my sweet Mom's birthday! (Happy Birthday Mom!) And I made some cute paper flowers to adorn the top of her presents. Since Mom loves sewing and crafting and all things vintage, I thought what better way to wrap her presents than with a vintage sewing pattern! (Now for all of you seamstresses out there who just can't bear the thought of using one of those adorable patterns as gift wrap... I assure you, the pattern I used was AWFUL (and incomplete)! No woman, (at least no woman I am aware of!) would actually wear one of these things... totally weird and impractical, but it had pretty colors on the paper sleeve.

You, of course could use any paper to do this, something like the Sunday comics from the newspaper might be cute... or I've used the security envelopes that come in the mail with the bills... the inside of the envelopes has pretty blue and grey designs! Regular newsprint and brown paper bags also make pretty flowers. Pretty much anything made out of paper would work. I'm all about recycling (is that upcycling?) all of that paper that always seems to be floating around our lives into something cute or useful (side note: if it is cute doesn't that make it useful??? it should! But that is probably where my overly stuffed house comes from, the belief that if it is cute it must be useful! *note to self ~ just because it is cute does not mean it should be made and kept or brought home and stuffed somewhere into this already over-crowded house.*) Sorry, back to the how-to...

For this project you'll need the following:
  • Paper
  • Scissors
  • Stapler
  • buttons (I used vintage shell buttons for the centers of my flowers, you can also use paper brads or small pompoms or anything else you think might look pretty in the middle of your flower but I like my little old buttons!)
  • glue
First you need to decide how big you want your flowers to be. Then fold or stack your paper as you'll need at least 6 thicknesses of paper for each flower. ( I used the pattern's paper sleeve and the instruction pages which are already folded and about 8 or 10 layers of paper deep. The more layers of paper the more three dimensional your flowers will be.  Once your paper is stacked or folded thick enough you'll need to cut out the flower shape. To do this I just "eyeball" it, and cut out a circle. It does not have to be even a little bit exact, you'll never notice if your circle is wonky by the time the flower is done.

Next you'll need to cut petal shapes into your flower. To do this cut straight little spokes in towards the center *important~ do not cut all the way into the center of your stack of flower circles! The middle of the flower is where you'll need to staple it in a minute!*

Next separate your stack of cut little circles like this:


This will help make your final flower extra fluffy! If your paper isn't one sided you can even flip a few of your circles over. The idea is to make sure your little petals do not realign exactly! After you have your pile of cut circles re-stacked staple them in the middle. I usually make an X with 2 staples just to hold it really securely. Then hold the flat flower in the palm of your hand and squish it all up! No really, You want to squish it and wrinkle your little petals all up towards the center of the flower. It will look something like this now:

From here you can fluff up the petals and separate them. Then it is time to embellish the center of the flower. I like to choose pretty little buttons to match the paper. Simply glue a button to the center of the flower and Ta-Da you're done! You can add these flowers to just about anything! They are sure to perk up your next gift.
Isn't this pretty?! I used a vintage sewing pattern instruction sheet to wrap it, and the bow is vintage seam binding lace (I lucked out at a garage sale a few months back and found a ton of pretty vintage sewing notions for next to nothing!) and the little pale green seam binding label I used as a gift tag.


Tomorrow I'll try to post a tutorial for making another kind of sewing pattern flower that I also like to use for gift wrapping and decorating. Super easy and very pretty! Here is a teaser so you can see what they'll be like:

Friday, July 9, 2010

Jam, butchering, and playing in the fountains!

Whew! We had a full day yesterday! First thing in the morning we got up, ate breakfast and took care of chores. Then we made Strawberry freezer jam! Yum! After that I was headed to take a shower so we could leave and run some errands when Matthew suggested that we butcher the extra rooster we have been meaning to get rid of.

Every year I fall prey to those adorable little balls of fluff in the local feed store and end up buying extra chicks! Usually of the straight run "assorted" bantam variety (that means you pay your dollar and you take your chances... no telling what breed or sex you'll end up with!) They are so fun to have around and I love the extra variety they add to our little "barnyard-backyard". Well this year we found that we had several extra roosters, one of whom seemed rather ornery. I might have ignored that fact, but we now have a baby in the family, who will be toddling around soon, and I have seen too many "ornery" roosters turn down-right mean when they see a little bitty person roaming around "their" yard. I wasn't going to let that happen! So we talked about it and decided that we would just eventually put that rooster in the stewpot!

Well, the boys decided that yesterday was time to do just that! So we took the rooster and had regular high school biology dissection lab in our backyard. The boys were enthralled! My parents weren't very big on raising their own meat when I was a kid... so I learned how to humanely kill, eviscerate, and butcher poultry, deer (that is a story for another day), etc. from a book! (That is what you get from teaching a girl that she can learn anything she wants from a book, and allowing her to be interest led and practically self taught! Homeschooling really is great!!!)

After the rooster when into the Crockpot, and I finally had my shower we set off on our errands. Meanwhile some friends called and invited us to go down and play in the big fountains in the World's Fair Park. We had a wonderful time! The boys stayed cool and wore themselves out playing in the water, while Claire and I sat under a big shade tree and occasionally strolled over to splash in the water a bit too!

Matthew with the Sunsphere in the background.
Then we all went up into the Sunsphere to have a look around. We had never been up there before; it was a lot of fun looking out over the city trying to recognize familiar things!

After that we went home to enjoy a delicious supper of chicken chow mien! :-) and tell Daddy all about our day's adventures!

Thursday, July 8, 2010

Strawberry Jam

We made our jam this morning while Claire crawled around under our feet at top speed proving to me just how much more of this house I still need to baby-proof :-)


Nothing quite compares to the absolute RED of starwberry freezer jam! It is such a beautiful vibrant cheerful color! I like to make mine in regular glass jam jars, because those little plastic freezer containers seem so cheap and somehow degrading to put my gorgeous red jam in! I've never had a problem with exploding glass in the freezer, I just make sure to leave plenty of head space for the jam to expand as it freezes! I know what we'll be having for lunch :-)

Now we're off to deliver the herbs that I promised last weekend!


Thursday, July 1, 2010

Gathering Herbs for Tea

I am so very happy to be back home with my own little family! They are glad to have us here as well; a home just isn't the same without Mommy in it!
As I walked around outside last night seeing how our garden had grown in my absence, I noticed many of my herbs were ready to be harvested for use in herbal teas! So this morning after the sun had dried the dew off of the plants the boys and I went out to harvest some herbs to be used in our homemade herbal teas throughout the rest of this year. Everyone in the family loves drinking herb teas all year long (well, everyone except Logan, although he will drink it if he is feeling bad, as "medicine" to help him heal). So during the growing season I try to get enough harvested, dried and stored away to last all winter long until the next summer.

I am trying to teach the boys all about the herbs that we grow and what they are used for. They love learning about them, but taste testing far outweighs everything else ;-) Today we gathered Red Raspberry leaves, they are great for use as "pregnancy tea" as well as tea for alleviating PMS symptoms. And while at the moment, I don’t need Red Raspberry leaf tea for anything (thanks to Claire who is still very much nursing on demand!) … it never hurts to be prepared!


We also harvested leaves of the Passion flower, which I have been reading are great for PMS when mixed with Red Raspberry leaves as a tea. Passionflower is also given as a tea to children as a calming agent (great for over-stimulated or hyper-active kids!) it helps restore calm and can even act as an extremely mild sedative to help soothe and relax and combat insomnia.

Then we gathered Bee Balm also known as Wild Bergamot. Bee balm is good for coughs, sore throats, nausea, and menstrual cramps. And it makes a very tasty minty-slightly citrusy tea. We grow the Monarda fistulosa which has a lavender colored blossom and a very strong fragrance.

Then Matthew and Ethan gathered spearmint while Logan concentrated on collecting catnip. The spearmint, everyone enjoys as mint tea. I also liked adding it to my red raspberry leaf tea last year when I was pregnant with Claire because I really loved the taste! The Catnip makes a good digestive aid, tonic, and mild sleeping aid. I have read however that some herbalists believe it can slightly increase menstrual flow, so they suggest never taking catnip while pregnant… I can’t honestly say I’ve ever noticed that effect myself, however, I would never take it while pregnant just in case! Catnip is also a wonderful insect repellant! I have found that crushing the leaves and rubbing a tiny bit of the juice on exposed skin really works well at keeping the mosquitoes away! Maybe that is one of the reasons cats love to roll in it so much? It probably works just as well at repelling fleas!


My very favorite flavor herb for tea we have growing right now is this:


It is an Anise Hyssop plant. This plant is three years old now and self sows easily! I’ve shared baby plants with most everyone I know! (If you live nearby and want a baby plant, be sure to ask!) It has the most yummy anise scent and flavor. It makes delicious tea! I’ve read that Anise Hyssop is good for fevers, coughs, colds, and to aid digestion.


While we were gathering the anise hyssop, the boys found a recently shed exoskeleton of a Praying Mantis below the bush.

So we searched and searched until finally we found the bright green now larger praying mantis hiding among the leaves.
It was a good harvest! Now I am moving the cuttings inside to hang in the pantry so that they can dry in the dark. Once they are dry and the leaves have been removed from the stems, we will store them in glass jars to await future use!

 
Drinking a daily cup of tea will surely starve the apothecary. ~Chinese Proverb
Related Posts with Thumbnails